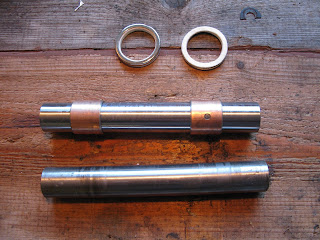
On a recent check over of my Velocette I noticed a little bit of slop in the swinging arm. Time for new bushes. For anyone not in the know Velocettes have an unusual swinging arm arrangement whereby there are two separate forks which clamp on to a trunnion (shaft) passing through the frame of the bike. The bushes are phosphor bronze and are pressed in to the frame.
Why did Velocette do it like this? I'm not too sure. The manufacturing must be a good deal cheaper and it is lighter. You might think that there would be issues of rigidity but Velocettes are good handlers so this isn't an issue. For the mechanic the main drawback is the need to make sure that the forks are aligned with each other on re-assembly. Like a lot of quirky Velocette engineering the bottom line is that it all works quite well so rejoice in the eccentricity of your machine and get fearlessly spannering.
This post is not a step by step how to it is more a few pointers non what not to do from myself who learnt the hard way....
 |
| Velocette rear fork trunnion. Yes the bike is used more than cleaned! |
First point to be aware of is that it really is not worth trying the job without taking off the chainguards and chain as a minimum. I thought that access was good and it would be a sinch without, I was wrong - I struggled and then gave in and took the lot off. You could have a crack at it with the wheel left in place as I did but to make life as easy as possible you might as well invest the time in removing the rear wheel and sprocket and the suspension units.
 |
| Using a socket to drift out the trunnion. |
Next point, it you think that the trunnion will just easily slide out you may be in for an unwelcome surprise. Mine had to be beaten out with extreme prejudice. The easiest way without proper factory tools is to use the good old socket of appropriate size as a drift trick. Once the trunnion is poking out the other end either use a long drift to smash it all the way through or grab and twist with a pipe wrench or mole grips. A bit brutal maybe but essentially the part is scrap anyway.
 |
| Trunnion on its way. |
Once the trunnion is out the forks will drop away allowing you to now have a crack at the bushes in the frame. In the absence of a slide hammer puller a long drift has to suffice. Once one side is out the old trunnion can be used as the drift for the other.
 |
| Shiny new trunnion courtesy of Grove Classics vs old trunnion. The wear is fairly easy to see. |
Now in with the new bushes. Ideally here make a fitting tool with a length of threaded bar and a mandrel turned to size. Failing this gentle persuasion should do the trick. Either way keep the bushes in the freezer for a good while before trying to fit and heat the frame gently with a hairdryer or hot air gun (just don't go so hot that you strip the paint....)
 |
| Remove chainguards and chain before starting the job! The side stand lug is now also fixed. |
With the new bushes in place fit the new trunnion through the swinging arm forks and frame. It will be a snug fit but shouldn't require too much persuasion. Oil it for fitting and grease once in place.
Now time for alignment. Folks seem to labour over this rather a lot but essentially once you've got the wheel back on and the shockers in place alignment will pretty much come naturally. To get the job perfect two straight edges will do the trick - one across the swinging arm and one against the wheel vertically. If they are 90 degrees to each other then the job is a good 'un.
There we go. Job done. If you take one piece of advice away from this it is to remove any parts that look like they will possibly need to come off to do the job comfortably before you begin. I tried without so that you don't have to.

No comments:
Post a Comment